Friday, November 30, 2012

FSU Beer Pong Table

Back again!
I guess in honor of football season ending I will finally put up the FSU football field beer pong table I made.


This one wasn't too hard, just a lot of measuring for accuracy, tracing and free handing.

What you'll need:
Big piece of plywood 
Paint of your choice
Brushes
Things to trace (I printed mine of the internet)
A cup (for circles) 
Ruler
Sealant 

Painting this kind of plywood was a little difficult just because it absorbs the paint more and it's harder to get the paint in the cracks.  But I do think it makes it look more like a football field because it makes it look like grass.   


 I measured about 1-1/2 inches for the white trim and the end zone line was the same.  I taped all these lines out with painter's tape.  The circles I traced with a big cup. 


Then I painted in the end zones and also measured out the yardages.  Between the inside of the white lines was measured to about 6 1/2 inches between each 10 yards.  Your board may be a different length so you'll have to adjust.  I free handed the numbers for the yardages and the dash marks in between.


Then I printed the ACC logo off of google and traced it onto the field.


After that I free handed the FLA State and the SEMINOLES onto the end zones.  
I also painted a garnet line in the middle of all of the letters to match the real field.  
Basically, if you are doing a different football field, just google a picture of it and follow that. 
My end zones don't look exactly the same as the real field but I was working with a lot less space. Ha


Then came for the center of the field.
There was no way I could free hand the seminole head so I just went with another FSU logo that I free handed.  


And that's it!
It's fairly simple if you just follow a picture off of the internet.  

Happy Crafting!
Always,
Mel =)

Saturday, November 10, 2012

Phi Mu Parents Weekend Fall 2012

Finally back again!! 
Been really busy with school, an internship, parents weekend and everything else.

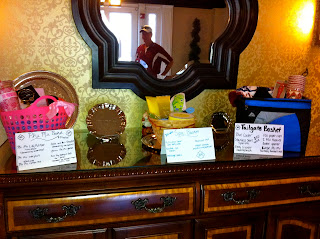
Thought with this first blog back I would show some pictures of the decorations I made for Phi Mu Parents Weekend this fall.  

Miss matching vases with wheat, mums, sticks and leaves

 Wheat and Carnations

 Wheat and Sunflowers


 Raffle Baskets
 Phi Mu Basket
 Spa Basket
 Football/Tailgating Cooler
 Banner by one of our awesome sisters!

 Wheat and Sunflower
 Donations box for the philanthropy
 Daisy's, Sunflowers and Wheat
 Wheat and Gerber Daisy


Hopefully I will be able to post a few more things when I get to craft over Thanksgiving break.  And hopefully, I will be able to post more often and not disappear for two more months!!

Happy Planning!
Always,
Mel =)

Wednesday, September 26, 2012

Beachy rope letter

Well it has definitely been a while since I've posted a craft for you guys!
The new semester at school has started and I have been busy with that, the sorority parents weekend and also my new internship! So exciting! But here I am with a new craft for you guys! =)


This one is reallllyyyy inexpensive and reallllllyyyy simple! 
I saw a cardboard letter in the Target $1 section and figured why not get it and figure out something to make it with, which I knew I could with Pinterest.  

All you need is:
Cardboard (or wooden) letter
Jewelry rope from Michael's
Hot glue gun
Mini sand dollars from Hobby Lobby
Paint (not necessary)

This is a fairly basic project so there won't be many directions, I'll just show with pictures.  One suggestion I have is to not hot glue every bit of the rope.  I would wrap it tight and then periodically hot glue, pretty much on the sides.  The bottom and top of the M I also painted a brown that matches the rope which you do not have to do.  So here are the directions in pictures.  


Its that simple!!

Happy crafting!
Always,
Mel =)

Tuesday, August 28, 2012

Beach sign!

I'm Back!!!! 
I was gone for 2 weeks for sorority recruitment so I couldn't post a blog.

This sign is along the same guidelines as the last sign.
I made this for a friend, based off of a sign he saw in our backyard.
I attempted to recreate it so here is my version.


Happy Crafting!!
Always,
Mel =)

Monday, August 6, 2012

Family Sign with Shells


This sign wasn't necessarily on Pinterest (I'm sure there's something like it somewhere) but my mom wanted a sign for by our fire pit.  She ended up liking it so much she hung it by our front door!
She wanted it to have the family names on there so I came up with the idea of a beach with each real shell and sand dollar representing one of us. 

What you need:
Paint (in your choice of colors, we made this one look like a sunset)
Shells
Mini Sand Dollars (you can get them in a little basket at a Hobby Lobby)
Rope (for the hanger)
Brushes
Hot glue gun

It is easy enough to do.
I am definitely not the most artistic person (I would say with all this practice I am getting better tho!) but it is a fairly simple picture.

I mixed the background the color I wanted, then mixed the sand color.


After that I wrote "The Joyce's" on it and then painted the birds, the clouds, the sun 
and the palm tree.


After that you just glue on the shells as you would like them placed.
Here I have them place with the shells as the guys and the sand dollars as the girls.
We don't know what my sisters baby will be yet so I just made it a shell to match the pattern. (It's the baby shell in the middle. So cute!)
We all have room to grow with our families, so we can add on later!


In order the biggest shell is my dad and then my mom.
My sister and her fiancĂ©.
My other pregnant sister and her husband.
And then me! lol

I put everyones initials under the shells, really small so they don't make it look weird.
You can do whatever you'd like with this project, it doesn't have to be a beach.
I just thought it would be cute with the shells as everyone!

The finished product, outside by the door!


Lots more projects to come, already have 4 more lined up!
I am going to start trying to post every Monday, so stay tuned!

Happy Crafting!
Always, 
Mel =)